This blog has moved! Redirecting...
You should be automatically redirected. If not, visit http://scrolls.mafgani.net/ and update your bookmarks.

Monday, October 31, 2005

The wonders of gdmflexiserver

If you're using GDM, this is the easiest way to get the "Fast User Switching" seen on Windows XP. All you have to do is type:


[darkknight@darkknight ~]$ gdmflexiserver


and you get a brand new login on Virtual Terminal (VT) #8. Successive runs of gdmflexiserver will open up logins on VT#9, VT#10 and so on. Just in case you don't know how to switch VTs, its done through the Ctrl+Alt+F<1-12> key combinations. The main login is on VT#7. Once you exit/logout from any of the sessions on VT#<8-12>, it will simply close. If you're not automatically returned to the original session, just switch back manually using Ctrl+Alt+F7.

One useful option of gdmflexiserver is the ability to run in a nested X server. The command in that case is:


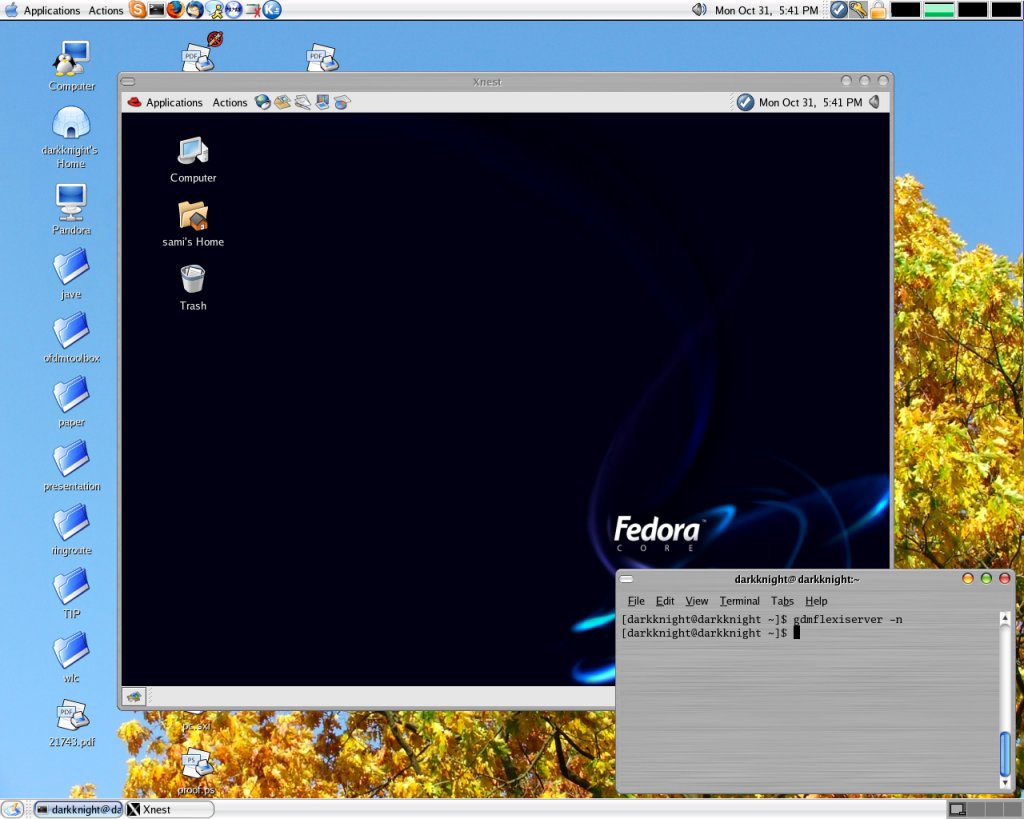
[darkknight@darkknight ~]$ gdmflexiserver -n


Now, instead of opening up a login in a brand-new VT, it will just open up a Xnest window with the login. The new X-Server is then a nested (child) server under the main X server on VT#7.


By default the Xnest window opened has a geometry of 1024x768 pixels. This can be changed by adding the -geometry option to the Xnest command in /etc/X11/gdm/gdm.conf :


...
# the X nest command
Xnest=/usr/X11R6/bin/Xnest -audit 0 -name Xnest -geometry 1280x1024+0+0
# Automatic VT allocation. Right now only works on Linux. This way
...


The geometry is specified as WidthxHeight+XCoord.+YCoord. After saving the modified gdm.conf, gdm must be restarted for the changes to take effect. This is done by logging in as root into one of the text VTs (VT#<1-6>) and issuing the commands:


[root@darkknight ~]# telinit 3; telinit 5; exit

New GDM Theme

Just designed my very first GDM theme. It's based on the "Pixel Girl" theme and uses the "Blue Turbulence" wallpaper. Here's a screenshot:


It can be downloaded from GNOME-Look.org or here.

To install and use, run the gdmsetup tool as root and look under "Graphical greeter"

Saturday, October 29, 2005

Addendum to VLC post

One thing to note is that after installing an older, more stable version of VLC on your 32 bit system, you will get an error while running "sudo yum update". The problem is that the Livna repository has a newer version of "libdvbpsi" than the one required by the VLC player. So to avoid conficts, do this:


sudo yum --exclude=libdvbpsi update

Friday, October 28, 2005

Using sudo - for the layman

Are you tired of becoming the root user just to perform updates? Well, you don't have to. Using sudo, you can perform all those restricted tasks without having to be the super user.

To do this, one has to edit the sudoers file.

The configuration of sudo is in /etc/sudoers. sudo is a setuid binary. Since sudo is owned by root, your effective id becomes root.

To edit the sudoers file, log on as root and change to /etc and:


[root@localhost etc]# visudo


This prevents multiple users from editing the same file at the same time because that would make things rather messy, don't you think?

Anyway, if you want to give yourself full permission to perform root tasks, edit the file as follows:


...
# User privilege specification
root ALL=(ALL) ALL
zubin ALL=(ALL)
...


Note that doing this does not give "zubin" root's PATH. If I want to run lpc, I'd have to do:


[zubin@localhost ~]$ sudo /usr/sbin/lpc


In this case, I'd have to provide my own login password to get sudo to work. sudo remembers the password for 5 minutes by default.

Now, if we modify the file like this:


...
# Defaults specification
Defaults:zubin timestamp_timeout=0, runaspw, passwd_tries=1
...


This means that the password will not be remembered. Setting it to -1 means that it will never be forgotten. The "runaspw" means that the user needs to have root's password to run sudo. "passwd_tries=1" means that zubin only gets one shot at getting the password correct. In general, many users can be added, each having a different default. If there is no ":" after Defaults, it is assumed to be global.

If we simply don't want to enter any password, then we'd have to do this:


# User privilege specification
root ALL=(ALL) ALL
zubin ALL=(ALL) NOPASSWD: ALL


sudo logs authentication failures to syslog by default. But if we change the file as shown, we can track every command run:


...
# Defaults specification
Defaults:logfile=/var/log/sudolog
...


The user can also only be given specific commands:


...
zubin ALL= /bin/kill,/sbin/linuxconf, /usr/sbin/zubin/
...


The "ALL" above refers to a network-wide sudo. In general, the particular machine name can be specified.

To give zubin the power to kill users "user1" and "user2"'s processes, we could do:


...
zubin localhost=(user1,user2) /bin/kill, /usr/sbin/zubin/
...


But then, zubin would have to do this every time:

[zubin@localhost etc]$ sudo -u user1


To avoid, this, we simply add this to the defaults section:


Defaults:zubin timestamp_timeout=-1, runas_default=user1

Tuesday, October 25, 2005

AVG and GMail POP3 Forwarding

The general directions on getting them to play nice are here.

Sunday, October 23, 2005

Image resizing the easy way

Here's another one of my god-he's-so-new-to-Linux posts.

I wanted to resize a very large (1280x1024) image into an avatar-sized (50x50) image and I found a really simple way of doing it:


[zubin@localhost ~]$ convert ~/Desktop/big_image.jpg -resize 50x50 ~/Desktop/avatar.jpg

GIMP tutorial for the dummy

Ever opened the GIMP and wondered "what the hell is going on"? No? I must admit that I do. The other day I found a really nice tutorial online that covers most of the tasks (subdivided into beginner, intermediate, expert, photo editing, etc.) in a very lucid fashion.

Find it all here.

Saturday, October 22, 2005

Updating to GNOME 2.12

From what I read, the new GNOME 2.12 desktop is really fast and has some new stuff. If you're interested in updating from 2.10 to 2.12, find instructions on how to do it here.

Author takes no responsibility.

Friday, October 21, 2005

VLC with FC4

So, here comes my first 2-cent-worth post. I know it's nothing spectacular but being a newbie, I feel a lot of things that are mundane matters for the experienced user are pretty confusing for the newcomer. Anyway, I realized that after installing VideoLanClient on my box, it would give a nice little segmentation fault and crash if I tried playing *.avi files. After consulting with darkknight, my mentor, I found out that the latest version of VLC (obtained from Livna) for FC4 using a 32 bit system was unstable. The solution: get an older version from the "dries" repository. Of course, you have to disable Livna so that yum gets the older version.

This I did as follows:

[root@localhost ~]# yum --disablerepo=livna --enablerepo=dries install videolan-client


And viola!! It works!!! The only other problem I had was that subtitles failed to load. So, I went back to the terminal and looked at the error messages. A truetype font was missing. I downloaded the missing font and simply put it in the destination directory. This was done as follows:

First the directory was created because it didn't exist earlier:


[zubin@localhost ~]$ sudo mkdir -p /usr/share/fonts/truetype/freefont


And then, I moved the font from my desktop (where I had saved it) to that folder:


[zubin@localhost ~]$ sudo mv ~/Desktop/FreeSerifBold.ttf /usr/share/fonts/truetype/freefont/


And there we go - if it wasn't for the damn midterm coming up, I'd have seen the movie. I guess I'll have to wait till Monday for that.

Thursday, October 20, 2005

New Member

There's a new member in the scene .. meet Zub .. he's just installed FC4(i386) and is pretty new to Linux .. he'll be posting his experiences as well .. It's a good thing .. there'll probably some posts dealing with issues that are daunting to a newbie but that I find too trivial to bother with .. ;)

Monday, October 10, 2005

To boldly go .. where??

This isn't really TeX or Linux related but it's pretty amazing .. while Stumbling along the net the other day, I came across this wonderful page:

http://www.mkaku.org/articles/

The articles are a must read for anyone even slightly interested in the future. I find the concept of using von Neumann probes for space exploration quite intriguing.

While we're still on the topic of the future, I just finished an article by Ray Kurzweil. It's called Human 2.0 (September 24th issue of NewScientist). It basically predicts that by 2020 we'll have $1000 machines with the intellectual capacity of the human brain.. and soon afterwards we'll be augmenting and transcending our biological being with nanotechnology and other engineered parts .. It all sounds like mixed blessings .. guess I'll find out soon enough. Cybernetic implants, here I come ... :)

A lot of other interesting articles can be found at:

KurzweilAI.net

Saturday, October 08, 2005

The 64-bit browser and 32-bit plugins dilemma ...

Although 64 bit OSs and hence browsers are (almost) commonplace these days, the same thing cannot be said of their plugin counterparts. To this date there are no 64bit Java and Flash plugins .. rendering a huge proportion of pages on the net inaccessible from a 64 bit browser ..


As of this moment, the popular solution to this problem is to have two browsers. A primary browser (e.g. 64 bit FireFox) and a seconday browser + plugins (32 bit). Opera seems to be a popular choice as the secondary browser since it's quite easy to get installed and use...

Thursday, October 06, 2005

Open files from a terminal

There's lot that can be learned from the conversations on the fedora-list. Today I learnt of a nifty little tool called gnome-open. Basically you just type something like:


[darkknight@darkworld ~]$ gnome-open file.cpp


and voila! It figures out the default application (under GNOME) for the files of type *.cpp and opens the file using that default editor. I haven't verified, but it seems that instead of a file an URL can also be specified. Mmm .. it definitely creates the possibility of writing portable scripts; at least on GNOME systems anyway :)

Tuesday, October 04, 2005

Addressing Individual Audio Channels of a Multichannel ALSA System

At first I thought I could just use one of the audio editors to create a 5 channel sound file and blank all the channels that I don't want. Sweep claims to be a multichannel audio editor but at the moment it's not possible to edit the individual audio channels. So, I tried out Audacity. Although Audacity allows the editing of the individual channels, it's not possible to save the edited file in a multichannel format - it's invariably down-mixed to stereo. So, custom sound files were no longer an option ..

At this point, I started looking at the ALSA PCM plugins. The route plugin seemed like the perfect candidate. In order to use the plugin I had to create the plugin definitions in the file ~/.asoundrc:


[darkknight@darkworld ~]$ cat .asoundrc
pcm_slave.rt {
pcm surround50
channels 5
}

pcm.front_l { #Front Left
type route
slave rt
ttable.0.0 1
}

pcm.front_r { #Front Right
type route
slave rt
ttable.0.1 1
}

pcm.front_c { #Front Center
type route
slave rt
ttable.0.4 1
}

pcm.rear_l { #Rear Left
type route
slave rt
ttable.0.3 1
}

pcm.rear_r { #Rear Right
type route
slave rt
ttable.0.2 1
}

pcm.front_both { #Front - Both
type route
slave rt
ttable.0.0 1
ttable.0.1 1
}

pcm.rear_both { #Rear - Both
type route
slave rt
ttable.0.2 1
ttable.0.3 1
}


The plugins can be used with the aplay utility:


[darkknight@darkworld ~]$ aplay -D front_c /usr/share/sounds/alsa/Front_Center.wav
Playing WAVE '/usr/share/sounds/alsa/Front_Center.wav' : Signed 16 bit Little Endian, Rate 48000 Hz, Mono


Of course it makes sense to use only Mono files with the plugins since the mappings are always carried out from channel 1. It's the ttable entry that's responsible for the mapping. The first value is the source channel (0 = channel 1, 1 = channel 2, etc.). The second value is the channel to route to. The third value controls the volume; a value of 0 means 0% volume and a value of 1.0 means 100% volume.

With the new plugin definitions, it's even easier to balance the speaker levels. The following command will alternate between the front speakers and the center speaker until interrupted:


[darkknight@darkworld ~]$ while [ 1 ]; do /usr/bin/aplay -D front_both -q /usr/share/sounds/alsa/Noise.wav;
/usr/bin/aplay -D front_c /usr/share/sounds/alsa/Noise.wav; done